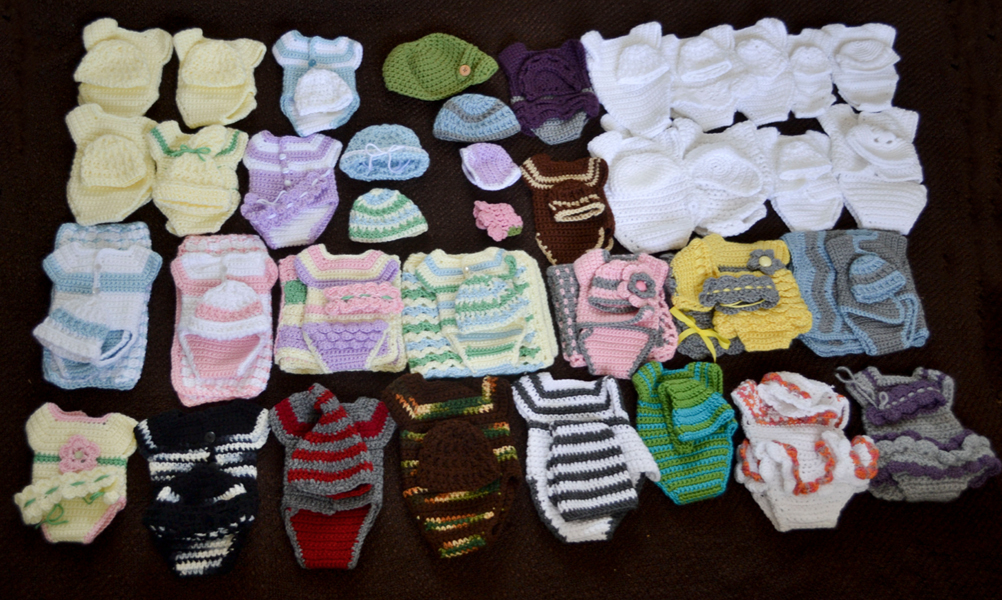
I have had many good intentions of photographing every donation this year and posting the photos. Instead I have done 46 angel photosessions so far this year in addition to 30 other sessions (regular client sessions and around a dozen rainbow baby sessions), on top of daily life and the demands of my real job as a nurse. I have had to just be content with keeping the donation room in some semblance of order. I am SO GRATEFUL for all of the wonderful people that have taken this project and just run with it! There is literally no way I could manage all of this without the amazing army of helpers behind me. The families that receive these lovingly handmade items treasure them so much.
These outfits were designed by a local woman who makes doll clothing. The boy's pants have velcro on the insides to make them completely open for ease of dressing. The dress opens completely down the back. I love the tiny booties and hat that match the blanket. These are appropriate for about a 20 week gestation baby.
These were also donated, along with several other similar sets in different colors. The kimono pattern was shortened into a shirt with an accompanying diaper and 10" square blanket. The shirt can either be closed by tying a ribbon belt all the way around, or with velcro attachments on the inside of the flap. This set is also appropriate for about a 20 week gestation baby.
A friend of mine modified the original kimono pattern that SHARE had posted. The small size pattern had too wide and deep of a neck opening. This new and improved version is much better! I did find that using this microfleece and rolling very tiny seams, it came out a little wider than anticipated. I plan on sewing a little bit wider side seams next time. Chris has also posted a simple flannel bunting pattern that doesn't have a hood. I really like it. I find that often, the hood is bulky and gets in the way a bit - I prefer to just use a hat.
The two larger size gowns are the large baby pattern posted on my main Angel Babies page under the "Patterns" tab. The small size boy gown is the 1-3 pound size. The pink kimono is the new pattern posted above. This is just to give you a bit of a size comparison. The two larger gowns were sewn by an 11 year old as a church service project. I love hearing who made all of the items donated, and I love to be able to pass that on to the families I serve!
This gorgeous knit dress was knit by Chris from Sew Much to Share. She has promised a pattern some time in the near future.
These items came from a church women's group in Utah County. The boy outfits open down the back nearly to where the legs come together, and the pink gown opens entirely down the back. I do not have patterns for these, but I would love one, so if you see a pattern, please contact me so I can post a link.
Last but not least, gorgeously crocheted gowns from one of my very favorite angel grandmas. I have requested a pattern link from her as well.
In the meantime, visit Stacy's crocheting blog for some new and updated patterns on her diaper shirt design.
Showing posts with label sewing day. Show all posts
Tuesday, November 20, 2012
Friday, March 16, 2012
Latest donations - super cute diaper and kimono sets
Tomorrow is a training session for new volunteers for Now I Lay Me Down To Sleep, the organization that I am affiliated with as an infant bereavement photographer. I really wanted to have a stack of outfits on hand for the new photographers so that they'd feel a little more prepared to go do their first sessions. I have been utterly amazed and humbled by the donations that have come pouring in, the countless hours of work and materials that have gone in to making this possible. My sewing day regulars really stepped things up a notch and we had an insanely productive session earlier this month, plus several brought me gowns they'd finished on their own. I also received some large donations from other groups of women that have been working on things for a few months, and the timing couldn't have been better. I cannot say thank you enough - words are inadequate for how my heart feels. Every time I look at the daunting needs and feel like I just can't do it all, my little legion of guardian angels gets busy and nudges all sorts of helpers into action. I am blessed!
In no particular order, because Blogger is being frustrating this morning, here you go:
These darling little double sided flannel kimonos were made by a local women's group. I don't have a pattern for them yet, but will work on it, because they're a great size for 20-23 week babies. The hat and diaper makes an absolutely adorable set! They have just the ties on the outside that you can see.
I have been mulling over various fabrics, and we've actually been experimenting with quite a variety on our larger gowns lately, and I am inclined to look for a thin microfleece to try this pattern on. I did a photosession recently for a baby that had weepy skin (a very common problem with angels), and the hospital had a fleece outfit for him that contained the moisture very well. Regular thickness fleece would probably be too bulky for the tiny size gowns, hence the microfleece idea. A simple decorative blanket stitch around the edges would finish it off nicely.
In addition to the kimono sets, this group made DOZENS of tiny diapers, hats, blankets, and also some of the keepsake boxes used by SHARE parent for hand and foot molds.
Absolutely wonderful stuff! It was clear that much careful effort and time went in to this, and I am grateful!
My March sewing day worker bees. We have a diverse and very fun group of regulars. My abs hurt from laughing so much by the end of the day. Good stuff :).
We had a huge epiphany this month. In the past we have used little clear snaps as the closure device on the back of the gowns. They are a pain in the rear to manage - glue in place first, then hand stitch. I have old lady eyes that have a terrible time seeing the teeny little hole in the middle of a clear snap to stitch, and it has been very labor intensive. In the past, I tried sticky dot velcro, but it gummed up my sewing machine to stitch them in place. I snagged a package of regular non-sticky velcro a few days before sewing day, and we cut each strip in half vertically, then 3/4" long pieces of that. Two velcro fasteners on the back of each is about 10,000 times easier and faster than dealing with the snaps. Why didn't I think of this earlier? I don't know. I'm a creature of habit. Like I said before, we've been experimenting with different fabrics as well. Sateen type fabrics can be tricky, and one in particular we were working with was very difficult to iron. It looks fantastic at the end, but was time consuming to get it to that point. A drapy polyester fabric proved to need serging around the edges to keep the fraying in check, but was otherwise not bad to work with and the final product was very nice and doesn't wrinkle. The basic message is to feel free to experiment. Just choose fabrics that are not see through or stiff/scratchy.
This isn't even all of the gowns I have at the moment! I have another dozen that need a final pressing, but I was running out of space in the closet, so I'll reserve them for after Saturday. AMAZING!
If you're not aware already, the pattern and step by step illustrated instructions for this basic tea towel gown is available on the main Angel Babies site. Click on the "Patterns" tab. I need to go in and modify a few things on the instructions, but am waiting for my webmaster to get home from his church mission in a few weeks because I invariably mess things up when I try to do it on my own :).
These darling little kimonos were made by the daughter of the talented smocker. The single button size is the original pattern size, and then she experimented with some other lengths. I appreciate having different lengths on hand for different sizes of babies. This pattern has a very clever little hole built in to it for the sash to pull through.
Last but not least, a couple of very talented ladies up in Idaho are on their way to me as I type this with this amazing collection of Diaper Shirt outfits. I nearly died of cuteness overload when I saw the wonderful details in the hats, and the coordinating sets. Great stuff!
Thank you all from the bottom of my heart! The families that receive carefully handmade items are so grateful. Keep up the good work! (And I will try to keep up with posting things more often here - I have a couple pattern posts I need to put up.)
In no particular order, because Blogger is being frustrating this morning, here you go:
These darling little double sided flannel kimonos were made by a local women's group. I don't have a pattern for them yet, but will work on it, because they're a great size for 20-23 week babies. The hat and diaper makes an absolutely adorable set! They have just the ties on the outside that you can see.
I have been mulling over various fabrics, and we've actually been experimenting with quite a variety on our larger gowns lately, and I am inclined to look for a thin microfleece to try this pattern on. I did a photosession recently for a baby that had weepy skin (a very common problem with angels), and the hospital had a fleece outfit for him that contained the moisture very well. Regular thickness fleece would probably be too bulky for the tiny size gowns, hence the microfleece idea. A simple decorative blanket stitch around the edges would finish it off nicely.
In addition to the kimono sets, this group made DOZENS of tiny diapers, hats, blankets, and also some of the keepsake boxes used by SHARE parent for hand and foot molds.
Absolutely wonderful stuff! It was clear that much careful effort and time went in to this, and I am grateful!
My March sewing day worker bees. We have a diverse and very fun group of regulars. My abs hurt from laughing so much by the end of the day. Good stuff :).
This isn't even all of the gowns I have at the moment! I have another dozen that need a final pressing, but I was running out of space in the closet, so I'll reserve them for after Saturday. AMAZING!
If you're not aware already, the pattern and step by step illustrated instructions for this basic tea towel gown is available on the main Angel Babies site. Click on the "Patterns" tab. I need to go in and modify a few things on the instructions, but am waiting for my webmaster to get home from his church mission in a few weeks because I invariably mess things up when I try to do it on my own :).
This absolutely gorgeous gown was hand smocked by a woman in Wyoming. Every single person I showed it to immediately oooooohed and aaaahed. Beautiful craftsmanship. I am waiting for the perfect angel to give it to.
These darling little kimonos were made by the daughter of the talented smocker. The single button size is the original pattern size, and then she experimented with some other lengths. I appreciate having different lengths on hand for different sizes of babies. This pattern has a very clever little hole built in to it for the sash to pull through.
Last but not least, a couple of very talented ladies up in Idaho are on their way to me as I type this with this amazing collection of Diaper Shirt outfits. I nearly died of cuteness overload when I saw the wonderful details in the hats, and the coordinating sets. Great stuff!
Thank you all from the bottom of my heart! The families that receive carefully handmade items are so grateful. Keep up the good work! (And I will try to keep up with posting things more often here - I have a couple pattern posts I need to put up.)
Thursday, October 13, 2011
How to hold a successful sewing day
To celebrate Elizabeth's third birthday, I did a one time blitz of making blankets, gowns, bracelets and hats for the hospital I was working for at the time when I realized that they basically had nothing in their infant bereavement stash. I patted myself on the back and thought I was done. But over the course of that year, every month or so, I'd get a call from someone who knew someone who knew that I made gowns, usually a very last minute urgent type of a need. I would frantically drop everything, pull out my sewing machine, and make a tiny gown. It soon became apparent that the need was great. So for Elizabeth's fourth birthday, I made the commitment to do monthly sewing sessions. I have done it ever since, with only one month missed. Over time, I have managed to get a great group of ladies. Each month we have a different mix, but I generally have at least 3 or 4 ladies that are regulars and can show everyone else the ropes. We've got a great system going, which I will share with you so that you can host your own sewing day.
I spend most of the morning setting up. I generally scheduled it from 10-3, open house style. I realize that people are busy, and they'd love to come help, but may not be able to devote 5 whole hours to it. Starting it at 10 allows me time to get the tables set up, some of the fabric cut and ironed, and the food prepped (more on that later).I set up three tables. One for sewing machines, one for finish work, and one for bracelet making. I do it in my home, so I use my kitchen countertop for cutting. This could be done an an additional table. The sewing machine table has an extension cord with a power strip running underneath it so that multiple machines can be plugged in to it at once. The finish work table is stocked with spools of thread, needles, buttons, embellishments like roses and bows, snaps, liquid stitch to glue the snaps in place before sewing, scissors, a candle and lighter to singe the ribbon ends.
I set up an ironing board off to the side. Before the first batch of ladies arrive, I make sure that I have at least a half dozen gowns cut out, side seams ironed, and ribbon and trim precut so that they can grab a gown and get started without any delay.
As people arrive, if they bring a sewing machine, I put them to work sewing gowns. If not, then I put a person to work on the ironing board, prepping more gowns and doing the final pressing on completed ones. Another person cuts out gowns, trim and ribbons. Everyone else either chooses finish work or bracelet sets. Finish work involves gluing snaps on, then stitching them once they dry, stitching on little embellishments on the girl gowns and bow ties on the boy gowns, and singeing the ribbon ends so that they don't fray. Three or four people on sewing machines can keep that many people busy with finish work without too much trouble.
A very important component of happy workers is good food. I serve lunch at noon, generally homemade bread and a delicious salad of some sort (not pictured - this time it was a lovely combination of mixed baby greens, pears, blackberries, blueberries, spiced pecans, blue cheese and a lemon poppyseed vinaigrette), and lunch meat/cheese and more fruit for the kids. I am fortunate to have enough space to turn the kids loose downstairs in the basement. This allows several more women to participate that wouldn't be able to otherwise.
Then it's back to work! No rest for the weary! Jerri's one of my biggest supporters and enjoys playing hooky from work every so often to come to sewing day.
Jenn gets a little wild with the iron. I have to reign her in. Notice in the background I have bins of ribbon. My friend Coree helped me find a source to order huge spools - 50 and 100 yard increments - for 5-6 bucks each. It's been a couple years since I ordered, so I will have to verify that the company is still in business. If you're interested, send me an email and I will see what I can find out for you.
Finishwork ladies. Sewing on snaps and bow ties. Two of the ladies are fellow NILMDTS photographers (the one at the end of the table is the ever wonderful Julie who took our photos), and the other woman is an angel mama.
Confession: I hate sewing on the snaps. I have a hard time seeing the clear snaps against white fabric. Therefore, I am always grateful to hand that task off.
Another one of my angel mamas working away. I order my beading supplies in bulk from Fire Mountain Gems. There's no real right or wrong way to do the bracelet sets - just make some aspect of the mom and baby ones match. For girls I do large pearl bracelet with pink crystals and a charm for the mom and a small pearl bracelet with small pink crystals and a matching charm for the baby. For boys I do a large pearl bracelet with blue crystals and a charm for the mom and a ribbon bow with the charm dangling from the middle set on a bar pin for the baby. Many other people have made sets for me out of different styles of beads. That's great! Just make them match. (Just realized I didn't take any photos of the finished product of any of these. I will add one when I do.)
We have a good time at sewing day. Good company, good food, and making things for angels - you really can't get better than that!
It sometimes gets a little chaotic with kids milling around and stuff everywhere, but really, the process flows pretty smoothly. We've got it down pat. Char, in the middle, likes to do things in a stack. She'll sew all of the side seams of a half dozen gowns, then all of the sleeves, etc. She's quite efficient at it. When we get the right mix of ladies, each of us like to do different parts of the gown, so we'll assembly line the process. Otherwise, we each just do our own individual gowns. Either way works.
This is a relic from a church group that did a sewing day for gowns for me. Since they had women that were all new to the process, the lady in charge separated out all of the tasks even more, and had instructions like this on each table. I would highly recommend this if you're doing a sewing session on a scale of more than 8 or so people, especially if none of them have sewn this particular pattern before. I'd also like to point out that on the Angel Babies main page under the Patterns tab, I have the pattern downloadable in addition to step by step instructions with photographs.
Finished products of gowns in both sizes. I took this photo on top of my cutting mat to show measurements, not because I think the green checkerboard look is particularly nice.
Here's a days' work. Plus another 12 gowns that just need finish work. In the past, I would spend three or so days after my sewing day trying to complete all the finish work. I drove myself crazy. I finally realized that it's actually good to put everything away right at the stage we wrap up at. I hang up the complete gowns that have had all the finish work done and a final pressing. The ones that haven't had snaps put in get put into a bag, and the gowns that are ironed but not sewn get put into another bag. Then we pick right up where we left off the next month and no one has to wait for someone else to do a step to get started.
So, to summarize, here are some tips for success:
- Advertise well in advance. I do this on my blog and on facebook. I like to allow 10-14 days for people to plan, if not more.
- Purchase your supplies well in advance. Use coupons and buy in bulk - it drives the total cost way down. You will need fabric, ribbon, trim, thread, liquid stitch, snaps, buttons, and embellishments for the gowns. For the bracelets you will need pearls in two sizes, crystals in two sizes, charms, jump rings, clasps, crimp beads, beading wire, stretchy cord (for the girl sets), ribbon (for the boy sets), glue gun, bar pins, and little bags to put the sets in.
- Set up tables for each major task. Cutting, sewing and finish work, plus a bracelet table if you are doing that as well. Set up an ironing area. Have extension cords and power strips available.
- Before the event starts, have a few cut out, side seams ironed and trim cut and ready to go so that there is no delay in putting anyone to work.
- If people are unfamiliar with the work flow, put instruction cards on each table. You may also want to print out a copy of the pattern instructions.
- Feed your worker bees. Everyone works better on a full tummy!
- Enjoy the company of other people as you do something wonderful. Take pride in your work and know that you are making clothing for angels :).
When you're all done making a series of gowns, I suggest contacting your local Labor and Delivery unit. Ask for the infant bereavement specialist. This may be a nurse, chaplain or social worker. Arrange a time to drop the items off. You may also contact an area coordinator for Now I Lay Me Down To Sleep. Go to the webpage and search for photographers. Area coordinators are highlighted in red. They will then be able to distribute the items to their photographers.
Subscribe to:
Posts (Atom)