Thursday, March 28, 2013
Featured on Teeny Tears
I had my sewing day today and we got an amazing amount done! My closet was looking pretty barren and sad before we started, and it's looking nice and full again. Then I came down to my computer to find that Megan from Teeny Tears featured Elizabeth today on her blog. Click here to read it. Thanks Megan!
Thursday, February 14, 2013
Latest donations - bracelet sets, kimonos and hats


Friday, January 25, 2013
Bracelet sets

I make the adult bracelets on beading wire. Sometimes we use closures like the one on the left, but most of the time, again for simplicity, I use a lobster claw clasp and a split ring to hook in to. Total finished length on an adult bracelet should be between 7 1/2" to 8", with an average of 7 3/4". I like to carry a few different sizes with me when I go on shoots. For the 8 mm size pearls, this works out to 10 on each side, two crystals in the middle, and maybe a couple of decorative spacer beads. As you can see, for the 6 mm size pearls, it takes more to achieve the same length.

Cut a 9" length of beading wire. Thread one end through a crimp bead, then the split ring, then back through the crimp bead the opposite direction. Slide the crimp bead down until there is just a small loop at the end, and smash flat with pliers. Snip off the excess tail. String half of the pearls, then a crystal. Bend the jump ring open, slide the charm on, and bend it back shut. String it on to the bracelet, then the other crystal and remaining beads followed by the other crimp bead and lobster claw. Bend the end of the beading wire around to go back through the crimp bead in the opposite direction, tug on the wire to cinch it down until there is just a small loop for the clasp to wiggle around in, and smash the crimp bead flat with pliers. Snip the excess end, and tuck any remaining tail into the first bead hole. Ta da! Done!


Monday, January 7, 2013
Knit Hat Patterns (and a BIG link to other great stuff)
My sister makes me the best hats for my angels. Darling, soft, perfectly knitted, and STRETCHY. Stretchy is the key, folks. It's super important when trying to get these on to fragile heads to have some give. I've received a few crochet hats that are reasonably so, but I have found that hands down, the knit ones stretch the best. Amy shared her patterns with me. I'm not a knitter, so they're meaningless gibberish to me, but hopefully some of you smart knitty type people will understand it.

Small Hat With Basket Weave
(5.5 inches in diameter)
Fingering weight yarn, #2 or #3 needles.
Cast on 48 stitches. K1 P1 first row. Repeat 7 rows. K2 P2 one row, repeat on second row. P2 K2 one row, repeat on second row. Repeat this pattern 2 more times. K2tog, P2, repeat to the end of the row. K1 P2 one row. P1, K2tog, repeat to end of the row. P1 K1 one row. K1 P1 two rows. K2tog, P2tog one row. Bind off.

This pattern can be made larger by adding on stiches in multiples of 4, and making extra rows before decreasing.
Medium Small Hat
(6.5 inches in diameter)
Fingering weight yarn, #2 or #3 needles.
Cast on 56 stitches. K1 P1 first row. Repeat 7 rows. Knit with stockingette stitch for an aditional 1 and 1/4 inches. Begin decrease. K6, K2tog, repeat for the rest of the row. Knit one plain round. K5, K2tog, repeat for the rest of the row. Knit one plain round. K4, K2tog, repeat for the rest of the row. Knit one plain round. K3, K2tog, repeat for the rest of the row. K2, K2tog, repeat for the rest of the row. K1, K2tog, repeat for the rest of the row. K2tog, repeat for the rest of the row. Bind off.

(7. inches in diameter)
Fingering weight yarn, #2 or #3 needles.
Cast on 64 stitches. K1P1 first row. Repeat 8 rows. Knit with stockingette stitch for an aditional 1 and 3/4 inches. Begin decrease. K6, K2tog, repeat for the rest of the row. Knit one plain round. K5, K2tog, repeat for the rest of the row. Knit one plain round. K4, K2tog, repeat for the rest of the row. Knit one plain round. K3, K2tog, repeat for the rest of the row. Knit one plain round. K2, K2tog, repeat for the rest of the row. K1, K2tog, repeat for the rest of the row. K2tog, repeat for the rest of the row. Bind off.
~~~
I was forwarded a GREAT LINK today to a newsletter from Care Wear that is chock full of fantastic knit and crochet patterns for hats, booties, buntings, gowns, bonnets, and blankets. Go take a look!
Tuesday, November 20, 2012
Latest Arrivals
I have had many good intentions of photographing every donation this year and posting the photos. Instead I have done 46 angel photosessions so far this year in addition to 30 other sessions (regular client sessions and around a dozen rainbow baby sessions), on top of daily life and the demands of my real job as a nurse. I have had to just be content with keeping the donation room in some semblance of order. I am SO GRATEFUL for all of the wonderful people that have taken this project and just run with it! There is literally no way I could manage all of this without the amazing army of helpers behind me. The families that receive these lovingly handmade items treasure them so much.

These outfits were designed by a local woman who makes doll clothing. The boy's pants have velcro on the insides to make them completely open for ease of dressing. The dress opens completely down the back. I love the tiny booties and hat that match the blanket. These are appropriate for about a 20 week gestation baby.
 These were also donated, along with several other similar sets in different colors. The kimono pattern was shortened into a shirt with an accompanying diaper and 10" square blanket. The shirt can either be closed by tying a ribbon belt all the way around, or with velcro attachments on the inside of the flap. This set is also appropriate for about a 20 week gestation baby.
 A friend of mine modified the original kimono pattern that SHARE had posted. The small size pattern had too wide and deep of a neck opening. This new and improved version is much better! I did find that using this microfleece and rolling very tiny seams, it came out a little wider than anticipated. I plan on sewing a little bit wider side seams next time. Chris has also posted a simple flannel bunting pattern that doesn't have a hood. I really like it. I find that often, the hood is bulky and gets in the way a bit - I prefer to just use a hat.
 The two larger size gowns are the large baby pattern posted on my main Angel Babies page under the "Patterns" tab. The small size boy gown is the 1-3 pound size. The pink kimono is the new pattern posted above. This is just to give you a bit of a size comparison. The two larger gowns were sewn by an 11 year old as a church service project. I love hearing who made all of the items donated, and I love to be able to pass that on to the families I serve!
 This gorgeous knit dress was knit by Chris from Sew Much to Share. She has promised a pattern some time in the near future.
 These items came from a church women's group in Utah County. The boy outfits open down the back nearly to where the legs come together, and the pink gown opens entirely down the back. I do not have patterns for these, but I would love one, so if you see a pattern, please contact me so I can post a link.
 Last but not least, gorgeously crocheted gowns from one of my very favorite angel grandmas. I have requested a pattern link from her as well.
In the meantime, visit Stacy's crocheting blog for some new and updated patterns on her diaper shirt design.

These outfits were designed by a local woman who makes doll clothing. The boy's pants have velcro on the insides to make them completely open for ease of dressing. The dress opens completely down the back. I love the tiny booties and hat that match the blanket. These are appropriate for about a 20 week gestation baby.


In the meantime, visit Stacy's crocheting blog for some new and updated patterns on her diaper shirt design.
Tuesday, March 20, 2012
Pattern links: Diaper Shirts, Hats, Headbands and Blankets
I met a couple of ladies from Idaho through the internet that are very talented with a ball of yarn and a crochet hook, and they have been an amazing resource for me. I finally got to meet one of them last week as she was passing through and brought me a huge stack of outfits that the two of them had been working on. She has very kindly typed up her patterns, along with photo tutorials, for diaper shirts, hats and blankets. Click on the links below to see her posts:
Diaper Shirts
Hat
Blanket
Adjustable Headband
Diaper Shirts
Hat
Blanket
Adjustable Headband
Friday, March 16, 2012
Latest donations - super cute diaper and kimono sets
Tomorrow is a training session for new volunteers for Now I Lay Me Down To Sleep, the organization that I am affiliated with as an infant bereavement photographer. I really wanted to have a stack of outfits on hand for the new photographers so that they'd feel a little more prepared to go do their first sessions. I have been utterly amazed and humbled by the donations that have come pouring in, the countless hours of work and materials that have gone in to making this possible. My sewing day regulars really stepped things up a notch and we had an insanely productive session earlier this month, plus several brought me gowns they'd finished on their own. I also received some large donations from other groups of women that have been working on things for a few months, and the timing couldn't have been better. I cannot say thank you enough - words are inadequate for how my heart feels. Every time I look at the daunting needs and feel like I just can't do it all, my little legion of guardian angels gets busy and nudges all sorts of helpers into action. I am blessed!
In no particular order, because Blogger is being frustrating this morning, here you go:

These darling little double sided flannel kimonos were made by a local women's group. I don't have a pattern for them yet, but will work on it, because they're a great size for 20-23 week babies. The hat and diaper makes an absolutely adorable set! They have just the ties on the outside that you can see.
I have been mulling over various fabrics, and we've actually been experimenting with quite a variety on our larger gowns lately, and I am inclined to look for a thin microfleece to try this pattern on. I did a photosession recently for a baby that had weepy skin (a very common problem with angels), and the hospital had a fleece outfit for him that contained the moisture very well. Regular thickness fleece would probably be too bulky for the tiny size gowns, hence the microfleece idea. A simple decorative blanket stitch around the edges would finish it off nicely.
 In addition to the kimono sets, this group made DOZENS of tiny diapers, hats, blankets, and also some of the keepsake boxes used by SHARE parent for hand and foot molds.
 Absolutely wonderful stuff! It was clear that much careful effort and time went in to this, and I am grateful!

 My March sewing day worker bees. We have a diverse and very fun group of regulars. My abs hurt from laughing so much by the end of the day. Good stuff :).

We had a huge epiphany this month. In the past we have used little clear snaps as the closure device on the back of the gowns. They are a pain in the rear to manage - glue in place first, then hand stitch. I have old lady eyes that have a terrible time seeing the teeny little hole in the middle of a clear snap to stitch, and it has been very labor intensive. In the past, I tried sticky dot velcro, but it gummed up my sewing machine to stitch them in place. I snagged a package of regular non-sticky velcro a few days before sewing day, and we cut each strip in half vertically, then 3/4" long pieces of that. Two velcro fasteners on the back of each is about 10,000 times easier and faster than dealing with the snaps. Why didn't I think of this earlier? I don't know. I'm a creature of habit. Like I said before, we've been experimenting with different fabrics as well. Sateen type fabrics can be tricky, and one in particular we were working with was very difficult to iron. It looks fantastic at the end, but was time consuming to get it to that point. A drapy polyester fabric proved to need serging around the edges to keep the fraying in check, but was otherwise not bad to work with and the final product was very nice and doesn't wrinkle. The basic message is to feel free to experiment. Just choose fabrics that are not see through or stiff/scratchy.
 This isn't even all of the gowns I have at the moment! I have another dozen that need a final pressing, but I was running out of space in the closet, so I'll reserve them for after Saturday. AMAZING!
If you're not aware already, the pattern and step by step illustrated instructions for this basic tea towel gown is available on the main Angel Babies site. Click on the "Patterns" tab. I need to go in and modify a few things on the instructions, but am waiting for my webmaster to get home from his church mission in a few weeks because I invariably mess things up when I try to do it on my own :).


 These darling little kimonos were made by the daughter of the talented smocker. The single button size is the original pattern size, and then she experimented with some other lengths. I appreciate having different lengths on hand for different sizes of babies. This pattern has a very clever little hole built in to it for the sash to pull through.

Last but not least, a couple of very talented ladies up in Idaho are on their way to me as I type this with this amazing collection of Diaper Shirt outfits. I nearly died of cuteness overload when I saw the wonderful details in the hats, and the coordinating sets. Great stuff!
 Thank you all from the bottom of my heart! The families that receive carefully handmade items are so grateful. Keep up the good work! (And I will try to keep up with posting things more often here - I have a couple pattern posts I need to put up.)
In no particular order, because Blogger is being frustrating this morning, here you go:

These darling little double sided flannel kimonos were made by a local women's group. I don't have a pattern for them yet, but will work on it, because they're a great size for 20-23 week babies. The hat and diaper makes an absolutely adorable set! They have just the ties on the outside that you can see.
I have been mulling over various fabrics, and we've actually been experimenting with quite a variety on our larger gowns lately, and I am inclined to look for a thin microfleece to try this pattern on. I did a photosession recently for a baby that had weepy skin (a very common problem with angels), and the hospital had a fleece outfit for him that contained the moisture very well. Regular thickness fleece would probably be too bulky for the tiny size gowns, hence the microfleece idea. A simple decorative blanket stitch around the edges would finish it off nicely.


If you're not aware already, the pattern and step by step illustrated instructions for this basic tea towel gown is available on the main Angel Babies site. Click on the "Patterns" tab. I need to go in and modify a few things on the instructions, but am waiting for my webmaster to get home from his church mission in a few weeks because I invariably mess things up when I try to do it on my own :).

This absolutely gorgeous gown was hand smocked by a woman in Wyoming. Every single person I showed it to immediately oooooohed and aaaahed. Beautiful craftsmanship. I am waiting for the perfect angel to give it to.


Last but not least, a couple of very talented ladies up in Idaho are on their way to me as I type this with this amazing collection of Diaper Shirt outfits. I nearly died of cuteness overload when I saw the wonderful details in the hats, and the coordinating sets. Great stuff!
Tuesday, February 7, 2012
New crochet pattern links

The remaining four hats came from patterns found on this page. Thank you, Wendy, for finding this great resource! So many great patterns in one place, and many of them with multiple sizes for babies of different gestation.


Other patterns on the page that look particularly useful include these cute little shell pattern hats, this layette set, and this "Fly Boy" hat. I have photographed three little angels with a condition called anencephaly, in which the brain and the upper portion of the skull do not develop. A hat that ties around the chin is really important for these babies. For the girl that I photographed, we were able to rig up a bonnet with ties that held it in place nicely, but for the two little boys...well, it was a problem. So I would love to have a few of the Fly Boy hats in my stash in various sizes.
Thursday, January 19, 2012
Local business shout out!
I have been limping by on barely and eventually non-functional sewing machines for the last few months, borrowing ones from my friends for sewing days. One of my sewing day regulars offered to call around to see if she could get any of the local repairmen to donate their services to get a machine running for me.
The Sewing and Vacuum Center in West Jordan, Utah graciously offered to repair it, and I dropped it off today. Very friendly folks over there, and I am thrilled to have their support. Every little bit counts, and money that I would have spent on repairs can now go toward fabric to make more gowns. If you have a sewing machine repair need, head on in and tell them that I sent you!
The Sewing and Vacuum Center in West Jordan, Utah graciously offered to repair it, and I dropped it off today. Very friendly folks over there, and I am thrilled to have their support. Every little bit counts, and money that I would have spent on repairs can now go toward fabric to make more gowns. If you have a sewing machine repair need, head on in and tell them that I sent you!
Wednesday, January 18, 2012
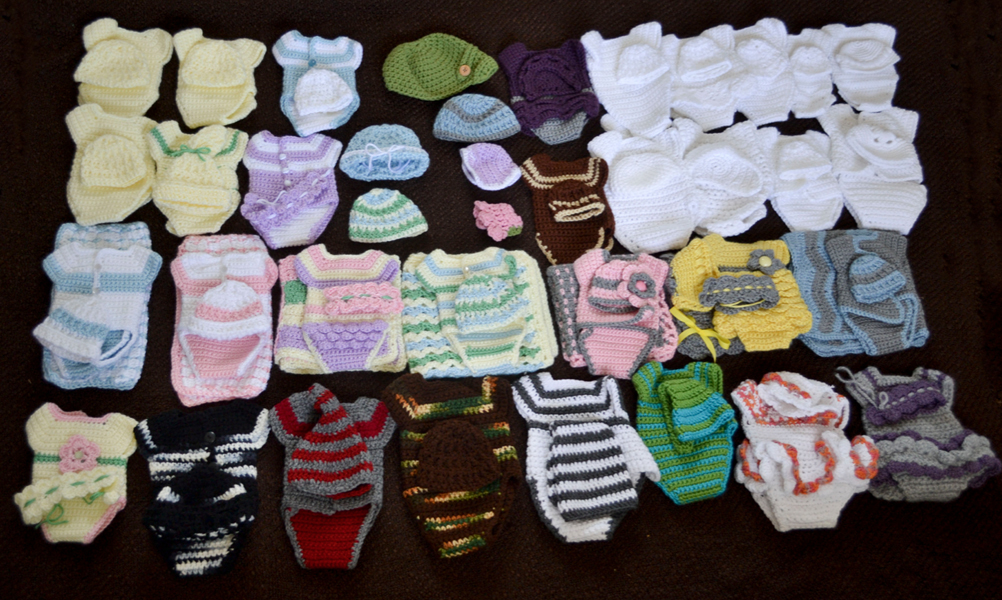
"Diaper Shirt" outfits


If you'd like more details about any of these, send me an email and I can forward Wanita's notes to you.
Subscribe to:
Posts (Atom)